
How to Use Graphite or Carbon Paper to Transfer Images
Jun 20, 2025Hey there, friends! It’s Karen from Over the Artsy Moon, and if you’ve ever stared at a blank canvas thinking, “How in the world do I get this cute design onto the surface without freehanding it?”—don’t worry, you're not alone. And you’re definitely in the right place!
Today, I’m sharing my go-to secret for transferring images onto canvas, wood, or whatever surface you're ready to beautify. Spoiler alert: It's so easy, you’ll feel like a creative wizard in no time. Whether you're a beginner, a DIY crafter, or even running a paint party business, tracing your design can take the stress out of starting—and get you to the fun part (painting!) much faster!
What is Image Transfer and Why Use It?
Image transfer is a way to trace a design directly onto your painting surface—whether that’s a canvas, wood cutout, or something else—using carbon or graphite paper. This is especially helpful if:
- You don’t feel confident in your freehand drawing skills
- You’re working with detailed templates
- You want consistent results (like for door hangers or party kits)
- You're prepping for a paint party and want everything ready to go
And guess what? Tracing doesn’t make you “less of an artist.” You're saving time, reducing stress, and setting yourself up for success. We’re here for fun, not perfection. In fact, it helps you focus on what you enjoy most—the painting!
Supplies You’ll Need
![]()
Here are a few things I recommend having on hand:
- A printed image or template (a.k.a. a tracer)
- Carbon paper or graphite transfer paper (more on that below!)
- Painter’s tape
- A pencil or stylus
- Your surface (canvas, wood, etc.)
Carbon Paper vs. Graphite Paper: What’s the Difference?
When it comes to transferring designs, both carbon and graphite papers have their place in your art toolkit—but they work a little differently. Carbon paper is often darker and wax-based, making it perfect for light backgrounds where you want strong, visible lines. However, those bold lines can be a bit trickier to erase. It’s ideal for fun, multi-layered paintings where the lines will be painted over anyway. If you're going this route, I highly recommend Woodworkers Carbon Transfer Paper—it comes in large sheets and is super budget-friendly.
Graphite paper, on the other hand, is wax-free and generally produces lighter, crisper lines. It’s easier to erase and comes in multiple colors, which is especially helpful for different surfaces—white for dark backgrounds, gray for light ones. The lines are bright and clear without being overpowering. My favorite is Saral Wax-Free Transfer Paper, especially the white version when working on black surfaces—it’s vibrant and easy to use.
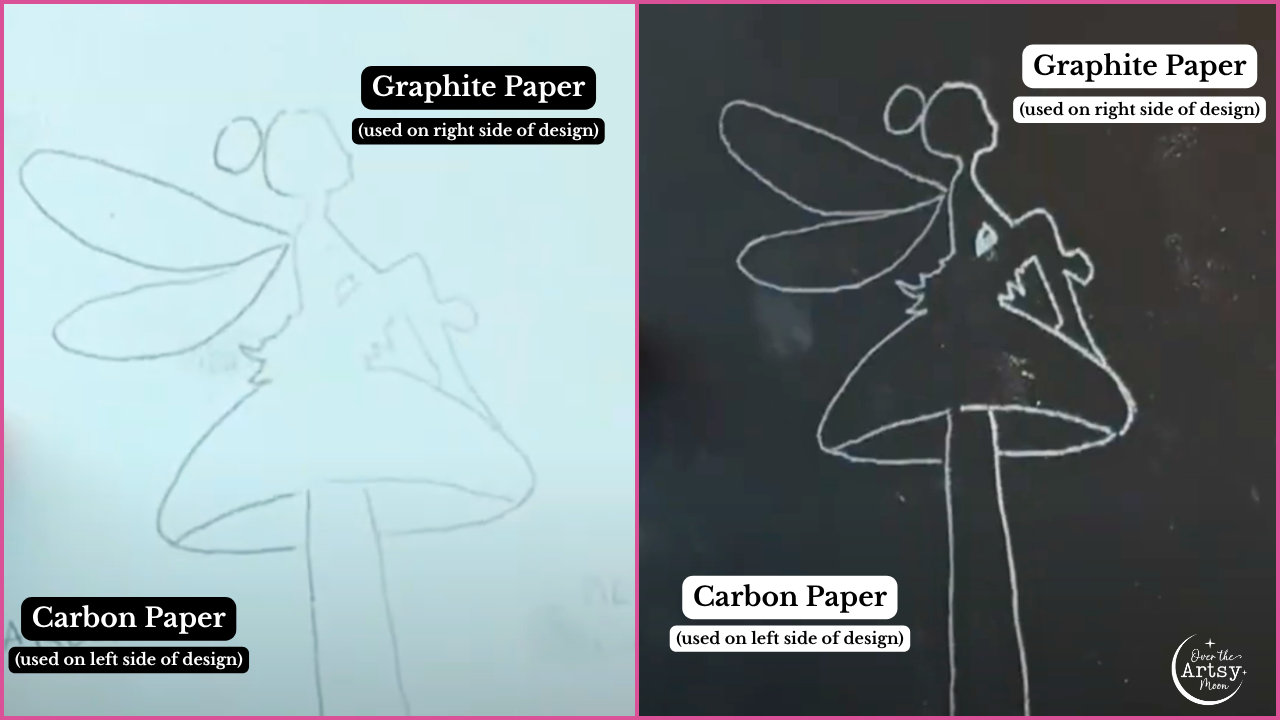
In the image below, you’ll see a side-by-side comparison where I used both graphite and carbon paper—each on half of the same design, applied to both white and black backgrounds. This should give you a clear visual of how each transfer method shows up depending on the surface color, making it easier to decide which one works best for your project!
Pro Tip: If you’re painting over your lines like we often do in my membership projects, carbon paper lines will hide beautifully under the paint. But if you plan to erase or tweak your lines before painting, graphite is the way to go!
How to Transfer an Image (Step-by-Step)
- Tape Your Tracer
Tape your printed design to your canvas or board so it stays in place.
- Place the Transfer Paper
Put your carbon or graphite paper shiny side down (for carbon) or transfer side down (for graphite) underneath the design.
- Trace Over Your Design
Use a pencil or stylus to trace your image. Press firmly but not too hard. Check as you go to make sure it’s transferring.
- Remove Paper and Check
Peel away the tracer and transfer paper—your outline is now ready for paint!
Here are a few bonus tips to keep in mind when transferring images. If you need to erase lines, graphite paper is your best friend—it erases easily and cleanly. Carbon paper doesn’t erase quite as well, but that’s usually not a problem if you’re painting over the lines anyway. If you’re working on a dark background, be sure to use white graphite paper or simply rub white chalk on the back of your image to make your lines show up clearly. And if you don’t have any transfer paper on hand, don’t worry! There’s an old-school trick that works like a charm: rub graphite or chalk on the back of your image, tape it in place, and trace over the front. It’s quick, easy, and gets the job done in a pinch.
Let’s Make It Fun!
Remember, art doesn’t have to be complicated. Whether you're painting for fun, gifting your art, or hosting a paint party, image transfers help simplify the process so you can enjoy what you love most—creating something beautiful. If you want to see how I used both carbon paper and graphite paper, be sure to check out this YouTube video. It’s a great way to see how both transfer images!
Want access to fun, ready-to-use tracers and step-by-step tutorials that make painting a breeze? Join the Artsy Moon Paint Club! Whether you're a beginner or just looking for relaxing creative time, our membership gives you everything you need—from pre-made tracers to full-length video tutorials designed to guide you every step of the way. You'll also get access to our private Facebook community, where you can connect with other paint lovers, ask questions, and share your work. Come paint with us and take the stress out of creating—just grab your supplies and start having fun!
Stay connected with news and updates!
Join our mailing list to receive the latest news and updates from our team.
Don't worry, your information will not be shared.
We hate SPAM. We will never sell your information, for any reason.
